Posts

Showing posts from January, 2019

ORA-01119: error in creating database file | Karan Rajpoot

                                      ORA-01119: error in creating database file Error: -  ORA-01119: error in creating a database file Cause: - Datafile size has not mentioned in the datafile creation command. Solution: - Mention the datafile size at the end of the command and re-execute it.  Example: - SQL> alter tablespace users add datafile '/u01/app/oracle/oradata/prod/users02.dbf'; alter tablespace users add datafile '/u01/app/oracle/oradata/prod/users02.dbf' * ERROR at line 1: ORA-01119: error in creating database file '/u01/app/oracle/oradata/prod/users02.dbf' ORA-17610: file '/u01/app/oracle/oradata/prod/users02.dbf' does not exist and no size specified ORA-27037: unable to obtain file status Linux-x86_64 Error: 2: No such file or directory Additional information: 3 Note: - In the above command datafile size has not mentioned at the end of the command, Put the datafile size and re-execute co

ORA-02140: invalid tablespace name | Karan Rajpoot

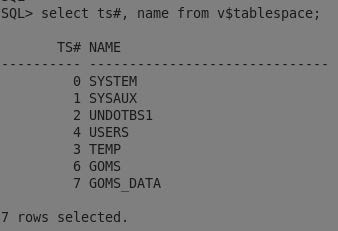
                                                     ORA-02140: invalid tablespace name Error: -  ORA-02140: invalid tablespace name  Cause: - Tablespace name has not provided correctly while running the alter command Solution: - Use the correct tablespace name and again retry to execute alter command Command to check the tablespaces name: - select name from v$tablespace; Example: - SQL> alter tablespace user add datafile '/u01/app/oracle/oradata/prod/user02.dbf' ; alter tablespace user add datafile '/u01/app/oracle/oradata/prod/user02.dbf'                  * ERROR at line 1: ORA-02140: invalid tablespace name Note: - In the above command, tablespace name provided incorrectly, Correct tablespace name was  USERS. Now again rerun the command using correct tablespace name. Hope that will resolve your issue.  

How to Add, Resize, Drop and Rename of a datafile in Tablespace

Image
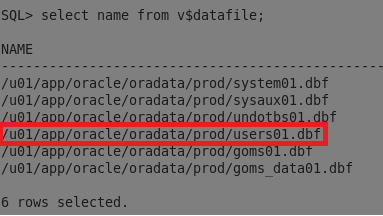
                                       How to Add, Resize, Drop and Rename a datafile in Tablespace In order to create a data file first, need to create a tablespace, To know how to create a tablespace  Click here To demonstrate, I will use USERS tablespace to Add,  Resize, Drop and Rename a data file. First, we can check how many data files are present under USERS tablespace through below command. Command: - select name from v$datafile; We can see from above output only a single data file is present under USERS tablespace. Addition of Datafile: - Command to add a datafile: - alter tablespace users add datafile '/u01/app/oracle/oradata/prod/users02.dbf' size 50m; The new data file has been added to my USERS tablespace. Resize of a Datafile: - Command to resize the datafile: - alter database datafile '/u01/app/oracle/oradata/prod/users02.dbf' resize 20m; Renaming of a Datafile: - We have a few steps to rename a data file: -

How to Create/Drop/Rename Tablespace in Oracle | Karan Rajpoot

Image
                                                            How to Add/Drop/Rename Tablespace in Oracle  Tablespace: - Tablespaces are the first level of logical origination in your database . Data for Oracle tables, indexes, etc is stored in data files, but never when an object is defined, the object is associated with a file directly. All the time the Oracle objects are located in the tablespaces. The tablespaces are logical concepts and each tablespace is in relation with one or more physical file. So, when an object is created in a tablespace, the data will be stored automatically in the files associated with that tablespace. In our database, we have several tablespaces which store our data: - 1) System Tablespace: - This tablespace is created automatically when the database is created. The SYSTEM tablespace is always online when the database is open. 2) Sysaux Tablespace: - Sysaux tablespace is also a mandatory tablespace and it is also created at the time of data

Oracle "Redo log Groups addition/deletion" | Karan Rajpoot

Image
                    Oracle "Redo log Groups addition/deletion" Step 1) To add redo log group first we will check the log groups, members details, location, and size. Example: - From the above output, we can see we have 3 groups and inside every group, we have 1 member each of size 50 MB and the location is /u01/app/oracle/oradata/karan/ Step 2) Now we will add one group and check the status of that group. Example: - Now again we can check the details of log groups and member. Now the 4th group and a member of 50 MB has been added successfully. Step 3) Now I will add one more member to the 4th log group. Example: - We can see from the above output that in group 4, now 2 members are there. Steps to drop the latest added group and member Note: - We cannot drop CURRENT members as shown in the above output, So I will add a new member in group 3 and then I will drop that member. Step 1)  Addition of new

How to do "Multiplexing of Control Files" through spfile ( server parameter file) in Oracle 11g

Image
Step 1)  To perform "Multiplexing of Control Files" through spfile ( server parameter file)" first we need to create spfile from pfile. Example to create spfile from pfile: -                                       Step 2) Copy the control files in physical location from 'cp' command. Note: - At present, I have 2 control files,  I will add one more Control files in the same location. Example: -  Now you can see from above output control04.ctl file has been physically added successfully under /u01/app/oracle/oradata/prod/control04.ctl location. Step 3)  Now you need to set the same through alter command. a)  first shut down the database                                          b)  Startup (Start the database through spfile)                                                                         Step 4) Now through SQL prompt alter the changes. Example: - Step 5) Now shutdown and start the database again and check

How to do "Multiplexing of Control Files" through pfile (parameter file) in Oracle 11g

Step 1) First step is to check how many control files are in IN USE. Example: - SQL> select name from v$controlfile; NAME -------------------------------------------------------------------------------- /u01/app/oracle/oradata/prod/control01.ctl /u01/app/oracle/fast_recovery_area/prod/control02.ctl Note: - As from the above output we can see 2 control files are in IN USE. Now I will add one more control file in /u01/app/oracle/oradata/prod location. Step 2)  Second step is to edit pfile which is under ORACLE_HOME/dbs location. Example: - prod.__pga_aggregate_target=339738624 prod.__sga_target=503316480 prod.__shared_io_pool_size=0 prod.__shared_pool_size=142606336 prod.__streams_pool_size=0 *.audit_file_dest='/u01/app/oracle/admin/prod/adump' *.audit_trail='db' *.compatible='11.2.0.4.0' *.control_files='/u01/app/oracle/oradata/prod/control01.ctl','/u01/app/oracle/fast_recovery_area/prod/control02.ctl', '/u01/a

How to resolve "TNS-12541 : TNS : no listener" error

Image
To resolve "TNS-12541: TNS: no listener" error we need to check whether our listener is up and running. Step 1) To check whether our listener is up or running, we need to run below command Command : - ps -ef | grep tns Example: - Note: - In this case, my listener is not started,  So I need to start my listener Step 2) To start the listener, we need to run below command Command : - lsnrctl start Example: - Step 3) Now again check the status of listener whether it is up and running, It should be up and running Command: - ps -ef | grep tns Example: - Note: - Now my listener is up and running properly

Startup stages of database "Nomount" , "Mount" , "Open"

Image
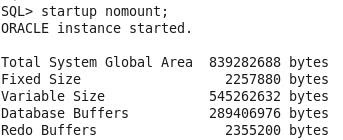
There are three stages of startup of Oracle database which are as follows below: - Stage 1) No mount stage: -   In this stage, Oracle reads  pfile(parameter file) or spfile(server parameter file)  to make the instance up and running. Instance: - SGA(System Global Area)+Background Process Note:- In this stage, the only instance will up and running not database. Location of pfile and spfile: -  ORACLE_HOME/dbs Example: - Stage 2) Mount stage: - In mount stage, Oracle reads the "Control File" to make the database in mount stage. Example: - Stage 3) Open stage: - The final stage is the open stage. In this stage user can connects to the database to perform their activity. Example: -

How to change database Mode from "Non Archive" to "Archive" in RAC

 High-Level Steps to change database Mode from "Non-Archive" to "Archive" in RAC 1) Cluster_database=false 2) Stop the cluster database 3) Startup the database from one instance in mount stage 4) Change the database mode to archive mode 5) Cluster_database=true 6) Shut down the database 7) Start the cluster database Step by Step Example : - Step 1) Set Cluster_database=false SQL> alter system set cluster_database=false scope=spfile sid='*'; System altered. Step 2) Stop the Cluster database through SRVCTL command [oracle@rac1 dbs]$ srvctl stop database -d karan [oracle@rac1 dbs]$  Step 3)  Start the database from one instance in mount stage SQL> startup mount; ORACLE instance started. Total System Global Area 1235959808 bytes Fixed Size     2252784 bytes Variable Size   788529168 bytes Database Buffers   436207616 bytes Redo Buffers     8970240 bytes Database mounte

How to perform "Cloning" through "Active database" in Oracle 11g

In my case, I am using below databases for cloning purpose Source Database : - prod Target Database : - karan Step 1) Set the environment through a source server. Example: -  [oracle@prod ~]$ . oraenv ORACLE_SID = [oracle] ? prod The Oracle base has been set to /u01/app/oracle Step 2) Login through sqlplus and start the database, make sure you start your database using spfile. Example: - [oracle@prod ~]$ sqlplus / as sysdba SQL*Plus: Release 11.2.0.4.0 Production on Fri Jan 18 20:53:01 2019 Copyright (c) 1982, 2013, Oracle.  All rights reserved. Connected to an idle instance. SQL> startup ORACLE instance started. Total System Global Area  839282688 bytes Fixed Size     2257880 bytes Variable Size   545262632 bytes Database Buffers   289406976 bytes Redo Buffers     2355200 bytes Database mounted. Database opened. Step 3) Make sure your database should in archive mode. Example: - SQL> archive log